
By Richard Mould-Ryan, October 2022
Introduction
A few years ago we switched energy supplier to a provider of 100% renewable electricity, and in early 2020 we decided the next step to reduce our direct carbon footprint was to stop using gas for central heating. This meant switching to some sort of heat pump, and like most people we don’t have a huge garden to dig up and lay pipes into, so it would need to be an air-source heat pump (ASHP).
Before and since having ours installed, I’ve come across quite a lot of misconceptions, myths and even misinformation about heat pumps, such as:
- They can’t keep older houses warm unless you spend huge amounts on extra insulation (not true);
- They only work with underfloor heating (not true, though they do work very well together);
- They don’t produce water hot enough for a bath or to keep your house warm (untrue);
- You’ll have to replace all your radiators (extremely unlikely);
- They’re very noisy (not true, though they’re not silent);
Some of these may have been true in the past, or be true with poor quality installations, but a modern heat pump is very efficient and will be suitable for many people, but you may have to use it slightly differently to your gas boiler. We’ll come back to this and these myths a bit later.
This is our experience of choosing an ASHP supplier, the installation process, and two years’ use. When you read it, please bear in mind that I’m not in the industry myself, this is just what I’ve learnt from our installer and others, and a reasonable amount of research. It’ll take about 20 minutes to read and 10 minutes to watch the linked video, and I hope it will help you to make a decision if you’re considering installing an ASHP, but don’t take my word for it, ask any potential suppliers lots of questions yourself.
Selecting a supplier and system design
We were originally prompted to look into an ASHP after being reminded about the Renewable Heat Initiative (RHI), which makes quarterly payments for seven years based on the amount of heat you generate, and over that time will repay a good chunk of the up-front installation cost. The RHI ended in March 2022, and has been replaced by the Boiler Upgrade Scheme (BUS), which pays a one-off grant of £5000 for an ASHP (£6000 for ground source). You need to use an installer who’s registered with the Microgeneration Certification Scheme (MCS), who will apply for the grant on your behalf.
Like me at that time, you probably don’t know a lot about heat pumps, so may find it hard to decide which installer to use, bearing in mind that the cheapest often isn’t the best option. To help you out, this website lists ten questions you should ask a potential installer, and this ten-minute video by Heat Geek does something similar in a slightly more technical way – don’t be put off by the back-to-front baseball cap!
In the video, Heat Geek talks a lot about “system temperature”, which is the temperature of the water that the pump will send to your radiators during the coldest weather. This is really important, because the lower the system temperature, the more efficiently your heat pump will operate, and the less it will cost to run. Its efficiency is also referred to as the “Coefficient of Performance” (COP), which Heat Geek also talks about. This is basically the amount of heat energy (kWh) generated by the pump for every unit electrical energy (in kWh) used to run the pump.
Something that Heat Geek doesn’t mention is “weather compensation”, which is a design feature where the heat pump varies the temperature of the water in the radiators depending on the temperature outside. If having your radiators at 50oC keeps your house warm when it’s -3oC outside in January, they don’t need to be that hot when it’s 10oC in March, and the lower the radiator temperature, the more efficiently your heat pump will run. So in addition to the questions you’ll find above, I would also ask potential installers whether the heat pumps which they supply have weather compensation (most do, though it might be called “auto” or “AI” mode) and how they would set it up.
We spoke to three suppliers, and chose ours because we were impressed by their commitment – they’re based near Farnborough, but the boss came down for a pre-visit to give a general idea of feasibility and price before the detailed survey – and because they were nearly the cheapest. They charged for the system with an additional fixed cost for each radiator which needs to be upgraded (see below), whereas another supplier’s price included for upgrading up to 10 radiators, more expensive if you don’t need to have so many upgraded – something to think about. That pre-visit was really useful, as it confirmed at an early stage where the pump could go, an estimate of how many radiators might need to be upgraded, and some other key details.
I’ve just been through the process again for my mother-in-law, and the huge increase in interest and demand has meant that some suppliers are providing a provisional estimate based on a desk assessment of information you send them, and others just didn’t reply to my enquiry. However we again found someone who was prepared to make a site visit before quoting, which still seems to me to be the best approach if you can find it.
Survey
The first step was for our installer to arrange a heat loss survey by an independent surveyor. This was included in the overall cost, but if you decide not to go ahead you have to pay for it, which in our case was £200. The survey did several things:
- Provided us with an Energy Performance Certificate (EPC) for the house, which we didn’t already have (and will need when we move), and is required to apply for the BUS grant.
- Assessed whether our insulation needed to be upgraded; to qualify for the BUS grant you need to have an EPC with no recommendations for improvement of cavity wall or loft insulation.
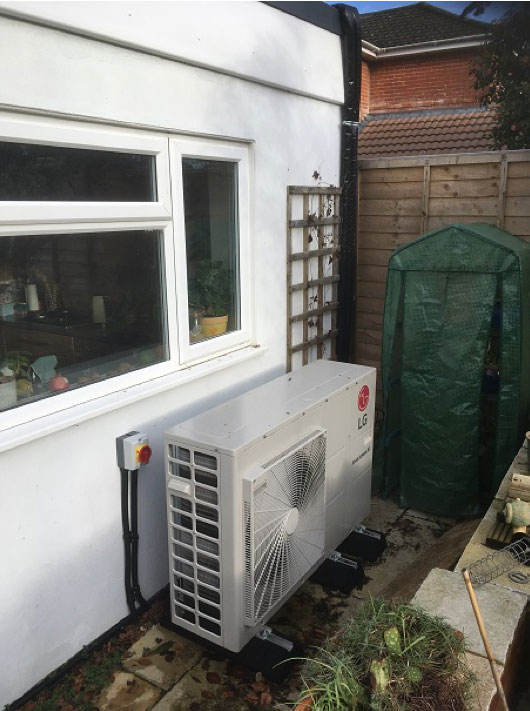
- Calculated heat loss on a room-by-room basis (as mentioned in the Heat Geek video) which determined the output of the heat pump needed, and how many of our radiators needed to be upgraded. The heat requirement for our house is 7kw, and we have a 9kw pump which fits neatly below our kitchen windowsill (see pic).
- Suggested whether we’d need a larger hot water tank.
We’re moving into the territory of the myths & misinformation now, and most have probably arisen for a reason mentioned earlier: whereas a gas boiler often heats water to 60-70C, a heat pump normally puts it out at 50C or less. This is still hot enough to do the job, but does it slightly differently, which is where changes to the rest of the system may be needed. Because the water in the radiators isn’t so hot, the radiators may need to be larger to provide the same total heat output needed to keep your house warm (as calculated by the heat loss survey). In our case, we upgraded 5 with little disruption, either by making them larger or replacing single panel versions with doubles, or in one case a double-panel with a triple.
For the same reason, you might also need to increase the size of your hot water tank: because the water may not be quite so hot, you may need more of it to run baths because you’ll use less cold water in the mix. We had quite a small 120 litre tank but never had any problems with running out of hot water, probably because we share the bath water! The original suggestion was for a 240 litre tank, which would have used all the space in our airing cupboard which is very useful to us, and seemed a bit over the top. So, I did some research & found that we’d be Ok with 180 litres which still left useful space in the airing cupboard. The space we lost for drying towels was replaced by changing the small radiator in the bathroom for a large towel rail, and we’re very happy with it. If you don’t have an airing/ tank cupboard, it’s also possible to install the hot water tank in the loft.
The main difference with the hot water tank is that the new one is much better insulated; the old one lost so much heat that it was keeping the bathroom warm, but the new one hardly loses any at all, so the larger towel rail offsets that. If your tank is large enough and well insulated, it might not need to be changed, though it does need to have an immersion element to heat the water up to 60C+ once a week to prevent any possible problems with Legionella.
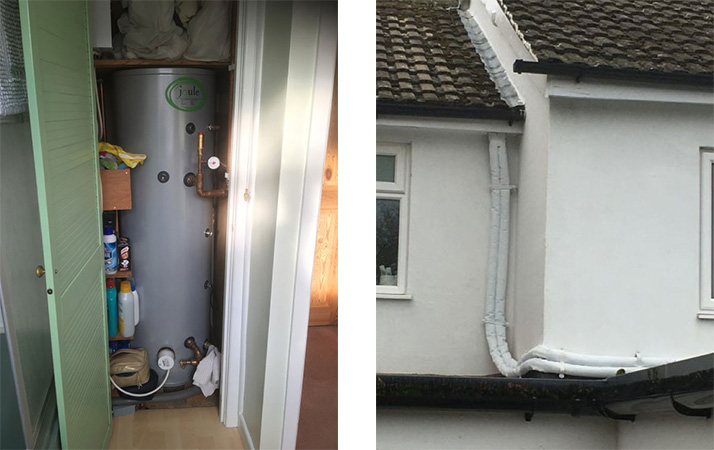
once painted compared to the unpainted pipes in the picture of the heat pump
Installation
The lead-in time from placing our order was about 3 months, though it could have been a little less. With the extra demand created by the Boiler Upgrade Scheme, I believe that at the time of writing (September 2022) some installers may be quite a lot busier now, though again the lead-in for my mother-in-law’s new system will be nine weeks from the initial contact and seven from the date we accepted a quote, and some others were suggesting less than one month. This is worth bearing in mind, because having no heating for three days would obviously be better from May to September than from October to March, though some installers may offer to provide room heaters while the central heating is off – another question to ask if you’re looking at an autumn/ winter installation.
Our supplier used a separate sub-contractor for installation, and after we’d confirmed we were going ahead, they visited to confirm exact details of locations of the heat pump, electricity supply (the pump needs its own separate circuit from your consumer unit), pipes etc, and checked the radiator changes, which ended up being slightly different to the recommendations of the heat survey. If I were doing this for myself again, I’d look for an installer who does all the work themselves, not using subcontractors, as detailed points like this can be ironed out an earlier stage with the person who’ll actually do the installation.
In terms of physical space, our pump is 120cm wide, 90cm high and 40cm deep, and it needs to stand 30cm away from a wall, and be a minimum of 1m from your boundary to comply with building regulations. The technical specification says there should be no obstructions to the outward airflow from the fan within 70cm, which was just about the case with ours, (though see “Up and Running” below), and the fan creates quite a strong cool breeze, so it’s probably a good idea not to have any tender plants in front of it.
The installation went very smoothly, it was all finished in under 3 days and we were very happy with the way it went and the standard of work. We were without electricity for an hour, hot water for just one day, and without heating for 2 ½ days. The only hiccup was that the pipes from the pump into the house had to take a different route from that originally intended. The plan was to run the pipes from the pump through the hole left in the wall where the boiler flue was removed about 3m away and connect to the water pipes which fed the boiler. However, because of an issue with the existing plumbing, the pipes had to run up the outside of the house and direct into the loft (see photo). This wasn’t a problem in practice, there was no extra cost, and they can be painted if necessary – masonry paint stuck to them very well – but I’ve since learnt that this isn’t ideal, as the external pipe run to/from the pump should really be no more than 10m, and ours is 11.5m. I imagine this may reduce efficiency due to increased heat loss, but it doesn’t stop the system from keeping the house warm. If I’d known this at the time I might have argued the point harder, and it might been avoided if we hadn’t been dealing with a sub-contractor, but I don’t know this for sure.
For readers with a little plumbing knowledge, we previously had a vented hot water system, but the new one is unvented and gently pressurised, there’s a small buffer tank in the loft where the old central heating header tank used to be, and the system needs to be topped-up from time to time by turning on a small valve, but this is really simple and was covered in the handover by the installer.
Inside the house, there’s a small control panel which needed to go somewhere we can reach it and where it can be connected to the heat pump; ours is in the kitchen. This is how an engineer accesses the system, and you can make some adjustments as well, though hopefully you won’t need to very much. The location is something to discuss with your installer, because the unit may contain a room thermostat which can switch the heat pump on and off in the same way as your existing room thermostat controls the gas boiler, so it would need to be somewhere fairly central and unaffected by heat sources such as the oven. We have a Nest remote thermostat which isn’t wired into the system, and can go anywhere you like if it can connect via wifi to a small wall-mounted box which connects to the control panel.
The other main difference with a heat pump is that there’s no timer unit; the pump is controlled just by the thermostat, and works most efficiently by using a lower heat output over long periods to maintain an established temperature. The thermostat is set to our normal daytime comfort temperature, (20C for us), and 2C lower at night, and the pump switches on and off to maintain these temperatures as required. It would be possible to set a more complex temperature pattern, but I don’t think there would be any particular benefit to doing so, unless you were trying to avoid the pump operating during the peak energy price periods. During the summer, or if you’re away for longer periods, you can switch it to “eco” mode, which is a lower threshold of 15C. The Nest thermostat also switches to Eco mode automatically if you’re away for a period of time and forget to do it yourself.
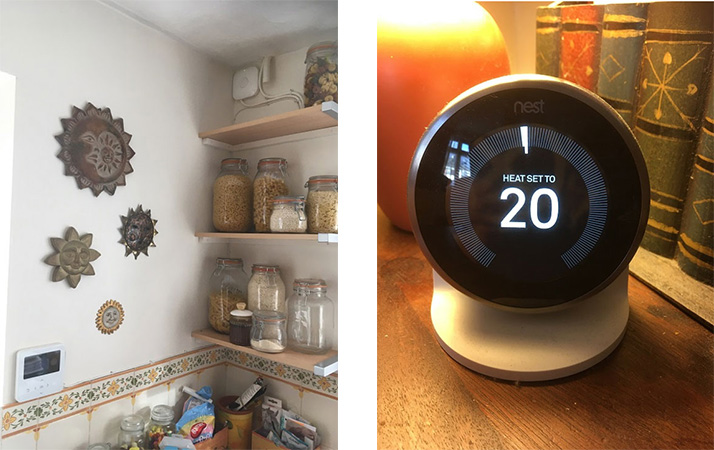
where the boiler used to be. Top Right: A close-up of the Nest remote thermostat
Up and running – 2 years experience
Since it was installed, I’ve become a bit of a heat pump geek myself, enthusing about them to anyone who’ll listen, including on social media. As a result, I’ve spoken to other installers who’ve been kind enough to share their knowledge, and some of things I’ve learnt are mentioned below.
First, and probably most important, the heat pump has kept our house lovely and cosy, including during the coldest spells of the last two winters. Our 3-bed semi was originally built as a 2-up 2-down cottage in 1870, then heavily extended in the 1980’s, and has some uninsulated solid walls, some insulated cavity walls, 150mm of loft insulation and 80mm foam in the flat roof. If the house had ever felt cold we could have increased the radiator temperature to above 50oC, but it was never necessary, which disproves the myth about heat pumps not being suitable for older houses, or requiring huge amounts of insulation. If we did add more loft insulation and insulated the solid walls we’d probably use less energy, but that would have been true with the gas boiler as well.
Earlier on I mentioned weather compensation, and it’s worth mentioning that this option wasn’t switched on until about 6 months after the heat pump was installed; initially it ran at a constant flow temperature of 50oC whatever the weather from September to March. After we switched weather compensation on, the flow temperatures were a lot lower, commonly in the range 35 – 45 oC, and only higher during very cold spells this winter, but the house remained just as warm as before, and the pump was working more efficiently.
The Nest thermostat lowers the room temperature if you’re not at home for longer periods, so if you go away for a couple of days in autumn/ winter the house can be a bit cold when you come home. The simple way to deal with this is to use the mobile app to turn the temperature back up a few hours before you return, or the feature which detects when you’re away can be switched off for the duration, because if the house gets cold the pump will have to work harder to get it back up to temperature.
During cold spells, the coolant pipes and fins on the heat pump frost up as cold damp air is passing over an even colder surface – just like in your freezer if you leave the door open – but when this happens the pump runs a defrost cycle which can also produce a brief but impressive cloud of steam! Also in cold weather, condensation builds up on the coolant pipes and fins, and the water runs onto the ground beneath the pump. In our case most of it drains into the gravel at the edge of our patio, but in very cold weather some freezes on the patio creating a small icy patch. Some installers create a soakaway beneath the pump to deal with condensation, but if yours doesn’t it’s something to consider pre-installation if your pump will be on or near a hard-surfaced area you walk on.
The other very important thing I’ve learnt from other installers is the need for an unobstructed route for the outflow of air from the pump’s fan. As you can see from the first picture above, there is a low wall about 70cm in front of our pump, and this is just about in accordance with the manufacturers installation guidelines. However it was probably affecting the pump’s performance, because the efficiency of a heat pump is lower in colder weather, and as air passes through the pump it is cooled by as much as 5 oC, so if that cooled air is drawn back through the pump again, the pump is using even colder air, so has to work even harder.
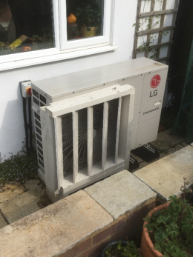
After I posted the picture of our pump on Twitter, an installer commented that the wall was probably causing some reuse of air already cooled by the heat pump. I tested this using coloured smoke, and found that the wall was making air from the fan billow up in front of it, and a fair amount was being drawn back into the pump. To address this, I built the deflector you can see in front of the pump in the picture below, and you can feel – and another smoke test confirmed – that the air now blows across in front of the wall and very little is drawn back through the pump, but it would clearly be better not to have to deal with this sort of situation in the first place if it can be avoided.
The other big myth was about noise. Our pump is rated at 60 decibels maximum, the same as normal conversation, but that is only when it’s working hardest, usually when heating the hot water after we’ve filled the bath, and most of the time it’s much quieter. It’s just outside our kitchen window, but you can’t hear it with the windows shut, and to hear what it sounds like from outside, you can watch this short video. The iPhone microphone is very directional, so it makes the pump seem louder than it is in comparison to the other background sounds, but just before the end a car goes past at the front of the house, and if you’re standing a few feet away from the pump they sound about the same volume. When it’s working harder it has at times has sounded a little louder, and some of the noise comes from the metal panels vibrating, but putting plastic wedges in between them can reduce that quite a lot. If you want to hear it for yourself, we’re always happy for people to pop round.
Cost and savings
The cost of a heat pump system will depend on several things, principally the size of pump needed; the number of radiators which need to be upgraded; and whether you need to replace your hot water tank. Our 9kw pump, five radiators plus new tank cost £11,400 including VAT, which is a lot of money, but there are things to offset this.
Most fairly modern boilers have a lifespan of about 15 years, and become less efficient as they get older, so if yours is over 10 years old, it’s likely to need to be replaced in the next 5 – 10, which depending on your system and if you want to make any other changes would cost £1500 – 3000, money you won’t have to spend if you opt for a heat pump.
The Boiler Upgrade Scheme grant of £5000 is a bit less than the Renewable Heat Incentive payments were, but is paid up-front, so the initial installation cost is lower. Allowing for boiler replacement, the net cost of our system now would be around £3400 – 4900. However it’s interesting to note that Octopus Energy have begun to install heat pumps and are claiming that after taking the BUS grant into account, they can do so for the same price as a gas boiler for most people – for more information see https://octopus.energy/blog/heat-pump-revolution/ .
So, will you save anything on your energy bills to offset any net cost? My personal view is that you shouldn’t expect to, but you might, depending on how well your system works, and what energy tariffs you are on. If you remember what Heat Geek says in his video, a COP of 2 (2 units of heat for every unit of electricity) would be very poor, a COP of 5 would be brilliant. I’d say that an average COP of 3.5 is a reasonable expectation, which is similar to the ratio between unit prices for electricity and gas. So, if you use the same amount of energy to heat your house with a heat pump as you did with a gas boiler, the cost will be roughly the same.
Whether this would apply to you depends to some extent on your energy tariff. If your electricity is more than 3x more expensive per unit than your gas, then you’re less likely to save money than if it’s only 2.5x more expensive or less. The changes in our tariffs over the last 2 years illustrate this. In September 2020 we paid 4.67p/ unit for gas and 14.76p/unit for electricity, so it was 3.16x more expensive. At those rates, based on our changes in total consumption with the heat pump, we would have paid £459 less for gas and £669 more for electricity, so £210 more per year than we did before. However, the same supplier is now charging 15.89p/ unit for gas and 32.88p/unit for electricity, so if we were installing a heat pump now, with the same changes in consumption we would pay £1561 less for gas and £1489 more for electricity over the next year, a net saving of £72/ year. Also, our electricity consumption would have been lower in the first year if we’d had weather compensation switched on from the start: comparing the same months year on year, our total electricity use (including car charging) was 10 – 15% lower with weather compensation active, so the reduction in consumption by the heat pump must be significantly greater.
Your savings may also depend on how you use your boiler now. If you use the thermostat to control your boiler rather than the timer, just turning the temperature down at night, then you might save more than if you use the timer to switch it on and off several times a day, but it’s hard to say with certainty.
A heat pump has a life expectancy of 25 years, so in our case, we would need to save £150/year for it to pay for itself over that time, and servicing costs appear to be a bit higher than for a boiler at present, an additional £100 – 200/year.
If you already have solar panels, then the situation is obviously better, because every kW unit used by the heat pump which you generate is basically free heating, saving maybe 30-40p depending on your tariff, and if you can add a storage battery to an existing solar PV set-up you’ll save a lot more, because a full battery charged for free by your solar panels will run the heat pump for a few hours before the sun comes up. If you don’t already have solar panels, the recent and potential future increases in energy prices mean the savings from installing them with a battery could also pay for the heat pump. We had solar PV panels and a battery installed in May – another blog may be coming soon! An increasing number of companies install heat pumps and solar PV, and an integrated system with the two technologies designed to work together should give the best results.
Conclusions
Based on our experience, the main physical reasons not to install an air source heat pump seem to be if you don’t have a suitable outside space for it, or if it’s physically impractical to upgrade or add the number of radiators needed. For us at least, a new hot water tank and five radiator upgrades were feasible, the noise of the pump isn’t an issue, and the heating performance has been fine.
It seems more likely that cost would be the reason for not making the switch. Depending on the changes needed to your system, after taking into account the cost of replacing your gas boiler, there will probably still be a net up-front cost of up to £3500-5000 with the BUS grant, but if Octopus Energy can install a heat pump for the same price as a gas boiler that will be a game changer. If there is a net cost you might still save enough on your energy bills for the system to pay for itself over its lifetime, but if it doesn’t, the cost is a lot less than most people pay for a new kitchen, and I’ve never heard anyone worry about whether that pays for itself.
However if you’ve read this far, cutting your carbon emissions may be more important to you than cutting your energy bills. Moving away from gas should reduce our direct carbon emissions as a family by 1.8 tons a year; I don’t have an accurate current estimate of our carbon footprint, but that is is 5 – 10% of the UK average for four people, and will be more if you’ve already taken other steps to reduce your carbon footprint – not to be sniffed at.
In my view, if you can afford it, do it – to reach net zero by 2050 the UK needs to replace over 20 million gas boilers. The more who make the change, the easier it becomes to dispel some of the myths and show how well they work, and the more support is provided for an important industry of the future. If you have any questions please do get in touch with me using the contact form here.
Richard Mould-Ryan, September 2022.
Hi Richard
I live in Freemantle. Do you have any recommendations for companies that fit heat pumps that you know of please. If you’ve time I’m happy to be contacted by phone on 07917346217
Thanks
Pete